So you’ve downloaded all the software you need and you’ve got yourself some cool looking graphics and overlays for your stream. Now what do you do with them? Where do you put the overlay and how do you add all your cool GFX to your stream.
Well that’s what I’m here for. I’m going to walk you through how to set up your scene in OBS to make the most of your graphics.
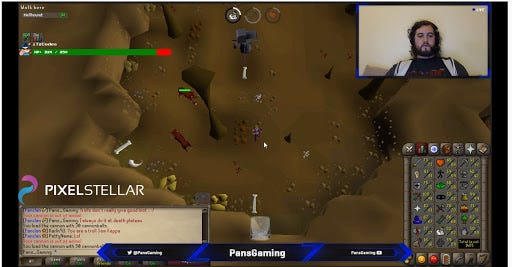
TwitchOverlay example
Setting up the Scene
So the first thing you need to know is what scenes are in OBS. A scene is a collection of sources that you can build up to give the final design of what your stream/video will look like.
When you first open up OBS you will see an empty scene that looks something like this. As you can see, under the black screen there are two white panels. The left one is a list of scenes; the other is a list of sources in that scene.
As you can see, there is currently only one scene and no sources within that scene. The first thing you’re going to need to do is add the source for whatever game/window you’re going to be playing. For this post I’ll add a display capture, but you’ll need to add the capture source for your game.
To do this you need to click on the '+' symbol at the bottom of the sources panel.
For most games, the game capture setting will be suitable but for others you’ll need to play in borderless window mode and use window capture. Use trial and error to see which works best for your game. Now that you’ve added your source, let’s see how your scene is looking.
As you can see we now have our first source in our scene!
This will be the main background for your scene and will be behind all other sources we add. If you need to resize your game capture (perhaps to fit your overlay) you can do so by using the little red circles in each corner, or through right clicking on the source, going to the transform menu, clicking edit transform and manually adjusting the size using the arrows.
Adding a facecam
So now we have our main source capture, what next? Well now we need add all those extra sources to make your stream look extra special and stand out from the crowd. Now I’m going to show you how to add your overlay, webcam source & slot, as well as all those other little things that make your stream look cool.
First things first, let’s get our face out there and set up our webcam. So, we will do the same as before, and click the + to add a new source to our scene, but this time we will select “Video Capture Device”.
Once you’ve done that you should see a screen that looks something like this. Now there are a fair number of menus here, which can be intimidating if you don’t know what you’re doing. However, you only need to focus on a few of them. The top dropdown box is where you select which device you want to use.
If you’re using an external webcam and your laptop also has one installed be sure the external one is selected as they’re usually better quality. Here I’ve selected my Logitech C920 webcam. The next menu that you need to check is the “Resolution/FPS Type” dropdown menu.
Here I have the device default option selected but I’m going to change that to custom and see what happens. As you can see, the picture has now disappeared. This is because there is currently no resolution selected. Different cameras will have different resolution options. Choose the best one for you.
Once you’ve chosen your resolution you can click OK and it will add the source to your scene. Let’s take another look at our new scene with our webcam source added.
TIP: If you are not streaming in 1080p HD video, don't set your camera to capture at that resolution. The highest resolution your camera should capture is the resolution that you stream at.
As you can see, my webcam source has taken over the whole scene! What can we do to fix this? Well, remember those little red circles that I told you could resize our first source?
Well we’re going to use those and shrink our webcam source to the correct size. Once you have resized it you can click and drag on the source to move it around your scene and place it where you think it looks good. I always favour the top-right hand corner. Now that you’ve resized and placed your webcam source where you want it, you should have something that looks a little bit like this.
Adding a webcam slot
Your scene is starting to take shape. You now have your main game source as well as a webcam source so all your viewers can see your pretty face. However, don’t you think the webcam looks a little naked just sitting there?
How about we add a border, or “webcam slot” to make it stand out a little more.
TIP: If you don’t have a webcam slot you can find some awesome graphics packages at visuals by impulse. They have some free graphicspackages, or you cango this section to get a 10% off code to use on any premade graphics package.
Okay so once you’ve got your webcam slot you’re going to want to add another source and this time you want to add an Image. Then find where you’ve downloaded your webcam slot to and select it. Once you’ve done that you should have this. Ensure the image is transparent then press OK to add the image to your scene.
The image will be added into the centre of your scene so we’re going to need to move it, like we did to the webcam slot, to the right location. You may find it a little tricky to get the correct size to fit nicely over your webcam. An easy way to get the right size is to right click on your webcam source in the source panel, go to transform and click edit transform.
There you will be able to see the size of your webcam source in your scene.

Make a note of the dimensions and then go to edit transform on your image source and change the size of your image to correctly fit over your webcam.
Please note that if your slot has recent follower/donor panels beneath it, such as the one I’m using, you cannot use the webcam slot height to measure your image size.
You’ll need to just use the width and ensure you keep the aspect ratio. Once you’ve managed to get your slot nicely aligned over your webcam you should have something that looks like this.
A good thing to do at this point would be to lock your webcam and slot in place by clicking the padlock icon next to your image source and video capture source. This will prevent you from accidentally moving one or the other and making them out of sync.
Another handy tip if you want to move your webcam and slot is, if you select both sources in the panel at the same time, out can click and drag the sources in the scene to move both of them together.
Adding an Overlay
Awesome! Now your viewers can not only see the game you’re streaming, they can also see your pretty face and your webcam doesn’t just look like it’s floating in the middle of nowhere. Now what we need to do is make sure people know where else they can find you online through social media. “How can we do that?” I hear you ask, well through using an **Overlay**. If you’ve already got yourself an overlay, awesome!
If not, you can get one from VBI. and don’t forget to get your 10% off code. So once you’ve got your overlay we’re going to add another **Image source** just like we did with the webcam slot, and select your overlay image.
Once you have added your overlay you’ll need to size it according to your outgoing resolution. Usually overlays are made at the highest standard use resolution of 1920x1080, so you may need to scale it down if you’re streaming at 720p. Once you’ve added that, your scene should look something like this.
Adding an Alertbox
So now that we’ve added all those graphics, the next thing to do is get those fancy alert boxes and other things, like the bit jar, and add those to your scene. However, our sources panel is starting to look a little cluttered with all those sources. If we keep adding them like this, we might lose track of what each of them is.
Let’s just rename them to make sure we know what’s what. To do that just right click on each source and click on rename. Now your sources should be well labelled.
Okay now, let’s make sure that when someone follows/hosts/subscribes to you that they get a nice little shoutout on stream by adding an Alertbox to your sources. The most commonly used alertbox is from Stream Labs. They have a load of different stream tools for you to use so if you haven’t signed up yet you can do so via streamlabs.
Now once you’ve logged in to Stream Labs, you’re going to need to click on the “Widgets” on the left-hand side of the screen and select “Alertbox”. Once you’ve selected your alert box you need to copy the URL for the widget and then go back to OBS. We’re going to add another source, this time it’s going to be a **Browser Source** and we’re going to name it Alertbox.
Once you’ve done that you’ll be faced with a screen that looks like this. What you’re going to need to do now is paste the URL you copied earlier in the URL section of this menu. Then press okay. Now what you’ll see is what appears to be an empty source, just a red outline with nothing in. This is correct, as the only time something will show up in there will be when someone follows/hosts/subscribes/etc.
I’ve shown what it looks like when nothing is happening and when you press test below.
Again, you can resize and move this around by using the red circles and clicking and dragging in the scene. If you want to add any of the other stream tools that StreamLabs have, you follow the same process as we used for the alertbox. Add a browser source and paste the URL of the widget as the source.
Adding a second Scene
So you’ve finally finished your streaming scene! Well done! Now it’s time to get streaming! But what if you want to have a starting soon screen? How do we add that? Well there’s one more thing left for you to know before you get started. You can have multiple different scenes that you can switch between while you stream!
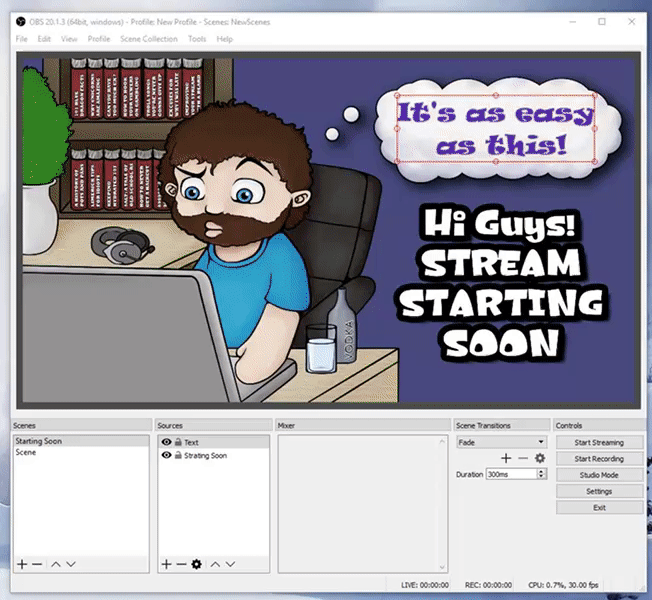
So the best way to have a starting soon screen is to add another scene! Let’s go ahead and do that by clicking the + button under Scenes, and let’s call this scene “starting soon”. Now we have a brand new scene that you can make into your starting soon screen.
I personally have had a screen made up as an Image that I can add text to. You can make your starting soon screen however you want, and when you want to switch between them all you need to do is click from one scene to the other.
And there we go! You are all ready to start streaming! My one final tip for you is to always make sure your sources are in the correct order in the list. The source at the top of the list is the one that’s the closest to the front of the scene.
In general, you’ll always want your game capture at the bottom and your overlay & webcam near the front. Remember anything that’s above a source on the list will be in front of that source in your scene!
That’s it for now! Thanks for reading and good luck with the streams!